Guitar Jar contributor, Ed Peczek takes us through the importance of Fretting Hand Positioning, highlighting the contributing factors of finger & thumb placement & pressure.
…at a basic level, the fingers are responsible for fretting notes and creating different pitches…
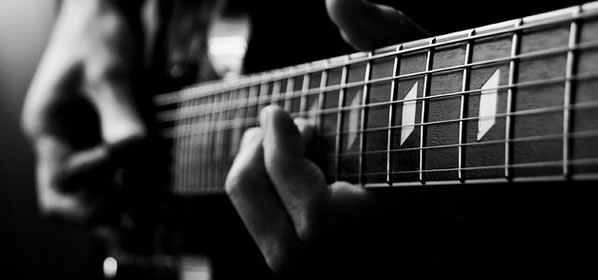
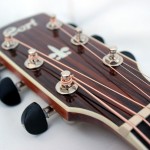
Note: For this article, the “Fretting Hand” will be focussing on the “Left Hand”, using diagrams that feature a guitar players left hand positioning.

The thumb
The thumb plays a vital role in ensuring the fingers are in the optimum position in which to perform the correct movements. Without correct thumb position, the movements of the fingers will be less efficient.
Thumb Position:
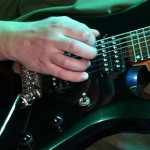
The thumb should be positioned somewhere behind the first or second finger, and placed in the centre of the neck.
The position of the fingers becomes easier when the thumb plays slightly on the side as opposed to placing the pad of thumb flat against the neck. This helps to rotate the fingers to be parallel with the fret board and strings, resulting in a much better playing position.

The thumb should be positioned somewhere comfortable behind the first or second finger
The role of the thumb is simply to support the fingers and maintain its position as described above, so as to allow the fingers to move freely.
The thumb does not squeeze together with the fingers or act like a vice. There should be absolutely no forward movement at all from the thumb. The only pressure it should feel is that of the neck as the fingers fret the strings.
It should stand its ground but never push forward, much in the same way a punch bag does not fight back, it simply stays in the same position and absorbs any pressure.
 Correct Thumb Position |
 Incorrect Thumb Position |
The movements and positioning of the fingers obviously play a crucial role in a guitarist’s left hand technique. At a basic level, the fingers are responsible for fretting notes and creating different pitches. The fingers also have more complex roles when employed in other techniques (such as slurs) however we’ll stick to basics for now, as what follows forms the foundations of every left hand technique.
Position and Movements

Correct Left Hand Position
Playing in the correct way ensures you do not expend more energy than necessary and also allows you to play faster, cleaner and with better intonation. Another common mistake is to place the finger on top of the fret you wish to play. This will sometimes result in the note sounding out, however it will sound muted in comparison to playing directly behind the fret, and will have much less sustain.
It is important to remember the role of thumb at this point. The thumb does not apply any pressure itself; it simply absorbs any pressure which the fingers apply to the fret board. By moving from the knuckle joint, you are engaging the tendons in the arm which helps to keep the hand relaxed. If you ‘squeeze’ the string (I.e. apply pressure from your thumb and your fingers) the hand becomes tense and does not allow your fingers to move freely.
In order to figure out exactly how much pressure is needed to fret notes efficiently, position your first finger on the first fret of the 6th string. At this point, do not press the string down towards the fret. Simply let the finger touch the string lightly in the correct place behind the fret. Begin playing the string with your right hand, you should hear a muted note and not the actual sound of the note itself. Slowly begin to apply a bit of pressure as described above (‘Finger Movements’), eventually you should hear a buzzing sound, this indicates that you are close to hearing the note. If you keep applying a bit more pressure the note should eventually sound.
This is the minimum (or most economic) amount of pressure needed in order to fret the note. You should aim for this every time you want to fret this note. You can repeat this exercise for each of the other fingers, as well as repeating it for different frets up and down the fret board, and also for each string.
The reason for this is that the amount of pressure required for each fret/string is a little bit different, but well worth getting used to if you want to build an efficient left hand guitar technique. It sounds like a lot of work and the truth is that you are likely to fine tune your efficiency as you become more experienced, whether you practice this particular exercise or not. However I would practice this quite a lot to begin with to the point where you are happy with your ability to control the amount of pressure you apply to the strings.
 Win free professional tablature courtesy of mySongBook
 eBook – New Approach to Scales
 Guitar Lesson: Modes Lesson #1 – Ionian
 Guitar Lesson: “Jar of Hearts” by Christina Perri
 Guitar Lesson: Diminished Scale Concepts
Guitar Lesson: Diminished Sounds Applied to the Guitar Fingerboard
Guitar Lesson – Artist Profile: Yngwie Malmsteen
Guitar Lesson: Diminished Scale Concepts
Guitar Lesson: Diminished Sounds Applied to the Guitar Fingerboard
Guitar Lesson – Artist Profile: Yngwie Malmsteen
 Become a Guitar Tutor with www.MyGuitarLessons.co.uk
Guitar Lesson – Artist Profile: Allan Holdsworth
Become a Guitar Tutor with www.MyGuitarLessons.co.uk
Guitar Lesson – Artist Profile: Allan Holdsworth
 Choosing the Right Guitar Teacher
Guitar Lesson: Stuck in a rut? Learn 11 New Licks
Choosing the Right Guitar Teacher
Guitar Lesson: Stuck in a rut? Learn 11 New Licks
 Guitar Lesson: Slurs (aka Hammer on and Pull off)
Guitar Lesson: Playing Over Changes
Guitar Lesson: Slurs (aka Hammer on and Pull off)
Guitar Lesson: Playing Over Changes
 Learning Jazz Guitar: Method books – help or hindrance?
Guitar Lesson: Jazz Guitar Triadic Improvisation
Free Guitar Lessons
Guitar Lesson: Funk, Groove and Rhythm Timing
Guitar Lesson: Jazz soloing over the song Blue Bossa
Guitar Lesson: Metal Riffs
Guitar Lesson: Progressive Techniques – Alternate Picking Part 1
Learning Jazz Guitar: Method books – help or hindrance?
Guitar Lesson: Jazz Guitar Triadic Improvisation
Free Guitar Lessons
Guitar Lesson: Funk, Groove and Rhythm Timing
Guitar Lesson: Jazz soloing over the song Blue Bossa
Guitar Lesson: Metal Riffs
Guitar Lesson: Progressive Techniques – Alternate Picking Part 1
 Lewis Turner Interview
Ed Peczek is a professional guitarist who performs all over the UK as a solo guitarist and session musician with various bands. He provides private guitar lessons in Manchester and also runs a beginner guitar course for adults and children.
For more guitar lessons and advice on learning to play the guitar, please visit the website:
Website: www.guitarlessonsmanchester.com
Email: ed@edpeczek.co.uk


3:51:00 pm
Wrong, wrong, wrong! Everbody has different hands. It’s fine for classical guitar, but this is misleading as the only way to fret notes and hold the guitar. It’s lazy frankly, to regurgitate the same old methods when guitar playing technique has made leaps and bounds in the last 20 years. As a guitar teacher for over 20 years I’ve seen many effective but “incorrect” methods of fretting notes. Joni Hendrix hung his thumb OVER the neck. Clapton plays vibrato with his thumb poking out under the neck. Are you saying these guys play wrong? Surely not?? Thumbism when fretting is pedantic and puts a barrier on fostering the enjoyment of playing guitar. This approach is one way of many dependent on the student hand size/shape/finger length/span. Not everyone has hands like Segovia, but why should that limit someones belief in their ability to achieve a high level of competence on guitar? Marty Friedman and Van Halen hold the plectrum “incorrectly”. Let’s berate them now shall we…
9:11:35 pm
I’m with Rick on this one. My hand does not sit in a position anything like that which is described above. Trying to FORCE my hand into something similar I couldn’t play at all, clearly the mechanics of my hand are very different to Ed’s idealised player.
Maybe I have freak-hands, if I sling my guitar down to a low/slouchy/cool/metal position (see Jimmy Page) I can’t even play open chords regardless of thumb position!
Jimmy: http://homerecording.com/bbs/equipment-forums/guitars-basses/jimmy-pages-low-slung-guitar-position-296169/
Ed, are you referring specifically to playing in a seated position? Or maybe this piece needs renaming to “Classical Fretting Hand Position”?
Dogma?
2:44:52 am
Probably worst post i have ever seen. Technique described in the article is the standard way of playing/shredding arpeggios scales and big stretches. Vibrato bending strings etc is another technique and of course it is not covered by the above article which is introductory in its nature.
Which means that depending on what you play you change positions.
Which means if Hendrix wants to stretch he has to change position if Clapton wants to shred he has to change position.
Basic technique is irrelevant of hand size also something that you seem to ignore
3:54:44 pm
I actuall meant Jimi Hendrix. Damn you iPhone autospell!
1:59:36 pm
This is a valid response and I’m glad you’ve brought it up. You’re right in referencing the guitar techniques of players such as Hendrix, Clapton etc as they ARE different from the method explained in this lesson. At the end of the day, every guitar played will have his or her own specific way of playing the guitar. What I’m intending to do in this lesson is give the reader a good understanding of ONE tried and tested method which is proven to allow the guitarist to play with minimum uneccessary tension in the hand and arm, whilst maximising movement both across the strings and up/down the fret board. This approach forms the basic technique of many great players. I have to question whether you’re suggesting that this method is completely incorrect and holds no value for the modern guitar player at all? This seems to be your point but perhaps I’ve misunderstood you.
This method of positioning the left hand I’ve explained above is typically associated with classical playing, true (however even here I will adopt other positionings for my fingers, it depends largely on the music). That being said this is also a method that I use often for both acoustic and electric guitar as it allows for flexibility of positioning/movement of the fingers, which is necessary for me to play the music I love. This method is not the ONLY way of playing, but I believe that every guitarist should at the very least study this method as it may break down barriers, particularly those struggling with scales or fast melodic passages (watch Vai or Satch and see how close they keep their fingers to the fret board when they play quickly, especially passages including use of the 4th finger. Better yet; actually think about WHY this would be of benefit as opposed to letting the 4th finger fly away from the fret board when it is not being used). Techniques for string bending and vibrato may vary from player to player and I myself use a differnt approach to the one explained above when executing these techniques on electric guitar.
At the risk of repeating myself, the method I have described in this lesson is certainly worth studying and will be of great benefit to a large number of guitarists. However as Rick rightly points out, it is not the ONLY way to play and there are some great players who do not employ this method in their playing. But the way I see it, learning to play in this way in addition to other methods will help you to become a more versatile player, and I think that’s something we should ALL aspire to.
For a guitar teacher with 20 years experience, I’m a little surpirsed at your reaction to this lesson. I would have thought that you yourself would have studied this method at some point. But perhaps you just wanted to make readers aware of the fact that there are other ways to play and for that I should thank you.
All the best,
Ed
9:32:49 pm
Hendrix, Clapton et al played well despite their unorthodox left hand positions, not because of them. Watch a technical player such as Rusty Cooley run through some passages up and down the fretboard with big stretches and you won’t see their thumbs hooked over the top of the fretboard because they couldn’t play like that with sloppy technique.
I think the information in this article is the right way to go for beginners. No point in making life difficult for yourself when you are starting out by adopting strange hand positions. If you’re doing some meaty blues bends then you might move your thumb but that’s a different story.